Showing posts with label younger children. Show all posts

Friday, March 30, 2018

Super Quick Bunny Craft


I did a bunny storytime today, and I supplemented my books and bunny songs with a very easy bunny craft. Then, some of the kids who come to my older craft club saw it, and they needed to make bunnies, too (which was awesome! But I made them cut out their own).


What You Need


  • Cardstock
  • Glue Sticks
  • Crayons, markers, googly eyes, etc. to decorate
  • Pom-poms or cotton balls - optional, but cute


What To Do


  1. Print the template below onto cardstock - I used white, so the bunnies could be colored in any way the artists saw fit, but colored cardstock would be nice, too. Cut the pieces out.
  2. Color and decorate your bunnies while they are flat, being sure to explain that one side of the bunny is the front, and the other is the back.
  3. Fold along the dashed lines.
  4. Apply glue to the inside of one bunny head and ears; glue to other side. You don't have to go any lower than the head.
  5. If desired, glue pom-pom to the bottom at the back, for a fluffy tail.
  6. Sit back and enjoy your bunny.


Template

I can't figure out how to upload the PDF version of this, so here it is as a JPG. It should print onto 8.5 x 11" paper perfectly.

Thursday, January 11, 2018

Valentine Stampers

I wanted to show you this super simple Valentine's Day craft in plenty of time to plan out an event.  It's such a cute idea, and the kids tend to really love it. I had some kids make two, three, or even four valentines for friends and family (but I set the limit at four, because that's a lot, you're good now). 


You Need:

Paper in various colors, some cut into hearts of various sizes
Paint (I used washable tempera paint) in red, pink, purple, and blue
Toilet paper/paper towel tubes
Rubber bands (optional, but useful)
Glue
Other things to decorate (glitter, feathers, crayons, etc.)


How It's Done:

Take your toilet paper tube and press in on one side, bending it inward. On the opposite side, bend it out a little bit. This makes it a heart shape. If desired, hold this shape in place by wrapping a rubber band on the outside of the tube.


Put out paper plates with various paint colors. Glue paper hearts onto construction paper, and decorate by stamping the cardboard tube into the paint, and then onto the paper.


Decorate with markers, crayons, glitter, etc., until you're happy with the result. 


Notes:

This was super popular, and very, very easy. The kids loved that I let them make multiple valentines, and some made them to send to grandparents, etc. They loved the "I made it myself!" aspect, and the parents enjoyed that it was easy, fun, and also looked pretty nice, even with the smallest children. (It's hard to mess up stamping.)

Friday, August 4, 2017

Dragon Crafts

 
It's the height of Summer Reading, and this year we're doing a Games theme ("Come Inside and Play!")

This week's theme is Dungeons and Dragons! And as such, we have celebrated Harry Potter, watched The Sorcerer's Stone, and done THREE dragon crafts - one for kids, one for teens, and one for little guys at storytime. I know you're super excited to hear about all three, so I've put them all in this one post.


Little Kids

For dragon-themed storytime, we read Dragons Love Tacos by Adam Rubin, If I Had a Dragon by Tom and Amanda Ellery, and When A Dragon Moves In by Jodi Moore. (Note: Dragons Love Tacos is much longer than I usually do for storytime, but it went really well!)We did the dragon hokey-pokey, sang "Pop Goes the Dragon,"and made what I was calling "dragon blowers," for lack of a better name.

You need:
  • Green cardstock
  • Paper streamers (red, orange, yellow)
  • crayons, markers, etc.
  • Stapler

You can use toilet paper tubes for these, but then you'd have to paint them all green, so I just made tubes out of green cardstock (cut in half and stapled at the back). We glued strips of paper streamers (the kind you use for parties - it's about $0.99 for a huge roll) to the inside. Draw eyes on the end that doesn't have fire coming out, and a couple nostrils, and you're all set! If you blow through the end with the eyes, the paper flames will flow out and look like he's breathing fire! SO COOL! A note: These are much easier to decorate *before* you staple the paper rolls together.

To be totally honest, I wasn't super thrilled with the way this craft turned out, but the kids loved it, and that was the important part.

Kids

Cut, decorate, staple - done!
His name is Norbert.
With elementary school age kids, we made dragons out of paper plates. I found this on the Pink Stripey Socks blog - you can download the template there for free.  I printed out the template on neon green cardstock (it's easier to see on a white paper plate), and cut out five copies - one for each of my four craft tables, and one extra in case it was needed. The kids were supposed to trace the pattern, cut it out, and then decorate. It mostly worked, but I neglected to realize exactly how hard it is for little guys to trace things, and I did a fair amount of helping - not that I mind, as long as I have a free hand. (They were pretty good at the cutting part, and excellent at the decorating).

Once you cut and color your dragon (we used markers and crayons), you staple him together and he's ready to be played with. That easy!

My dragon is rainbow tie-dye, because I made him and I enjoy cheerful things.

Teens

IT'S SO COOL!
The teen craft this week was dragon keychains. If you haven't made beaded keychains before, there are lots of tutorials online, and lots of patterns once you've got the basics, and while it looks somewhat complicated, it's really not that hard once you get the hang of it. I found this amazing beaded dragon keychain on DeviantArt, and cobbled together a pattern based on it.

You need:
  • string/jewelry cord
  • beads (pony beads work perfectly)
  • Keychains/fasteners 
  • Tape (optional, but helpful)

The first thing you do tape your keychain to the table, so you have a nice, stable working area. Next, cut a super long segment of string - like, 4 feet long. Better too long and cut off the ends, than too short and have to try to tie more on. Knot the middle of the string tightly to the keychain.

Let's take a look at our pattern.
The knot at the center of the circle (the keychain) is really one long string, but the two halves are colored blue and orange on the pattern, so you can see the difference between the two strings.

Our first line (going top-down) has our orange string going through two beads - go ahead and do that. The blue string also goes through the same two beads, but in the opposite direction. When you do this, you'll have two beads on your string, with the ends hanging down on each side (kinda like a bolo tie - see below). 

String beads on both strings.
Start your second line the exact same way: string three beads on the "orange" string, then string the same three on the "blue," going the opposite direction. Continue as per the pattern.

The tricky part here (which I simplified from the photo I saw on Deviant Art) is the wings. I only used one string for each wing, doubling back on itself at both the outer tip of the wing, and the bead closest to the dragon's body. I hope the pattern makes sense to you. 

The teens needed a little help getting started, and a little help with the wings, but they had a great time, and wanted to know when we could meet again and do different characters (I'd printed out some examples, like a butterfly and a Pikachu).


Finished dragon.

Overall


Dungeons & Dragons Week went well! The kids had fun, I had fun, a good time was had by all. I will definitely do the beaded keychains again, and the other ones were cute (but I don't like to repeat too often).


Wednesday, May 3, 2017

Edible Birdhouse

This birdhouse is edible! I mean, not for humans (probably), because this one is... for the birds. (I know, I'm hilarious.)

Anyway. This is a really neat craft. The idea is, you take a wooden birdhouse (I don't think cardboard or paper mache would work too well in this case) and decorate it with birdseed. Then, the birds can eat the seed, and you can scrape off the paste and decorate all over again!

I actually have two types of birdhouses that I used: solid wooden ones from Michael's; and ones that you snap together, made out of balsa wood, that I got from Oriental Trading. Both work just fine, though I prefer the Michael's pre-made ones, because I pre-assembled all the other ones (as this program had some little guys) and it took me forever. Older kids and teens could assemble their own houses, thus negating this complaint.


You Need:

Wooden birdhouses
Flour
Small paper bowls
Popsicle sticks
Various birdseed (CAUTION: some birdseeds contain nuts, and may be an allergy issue. Read your labels!)
Roasting pans or cookie sheets (optional but very helpful)


What to Do:

I set my table like this: Each place a paper plate with a birdhouse on it, and one popsicle stick.  I put out two aluminum roasting pans per table, and filled each with good amount of birdseed. 

When children arrived, I let them pick their birdhouse, and we made each child a small paper bowl with a couple spoonfuls of flour and some water, stirred with the popsicle stick, until it made a nice paste. Kids were instructed to smear the paste onto the flat sides of the birdhouses, and then push the house, paste-side down, into the roasting pan. As long as they had good paste coverage, the house would emerge covered in birdseed. 

Repeat until all sides are covered. Then you can hang your house outside. The birds can eat the seeds, and then you can scrape the paste off and start all over again. YAY for repeatable crafts!

Saturday, March 4, 2017

Read Across America Day - Make a Wocket for Your Pocket

Dr. Seuss's birthday (March 2) is Read Across America Day, where schools and libraries all over the country celebrate early literacy. Some places have kids dress up as their favorite characters, and they eat Green Eggs and Ham for lunch, or wear crazy socks (like Fox in Socks). 

As for me, it's usually a storytime with a craft. Since most Dr. Seuss books are super long (seriously, try to get through Fox in Socks and still have your toddlers paying attention), it's hard to pick some that will work. For my kids, I did:

 
The Foot Book - not one of my personal favorites, but the kids loved it. The surprise hit of the day! They all told me how they had feet, and their dolls had feet, and their cats had feet, and Mom has feet, and we counted the feet of every stuffed animal, doll, and little brother in the room.
 
A Great Day for Up - illustrated by Quentin Blake, so we talked about how Dr. Seuss wrote the words and drew the pictures for most of his books, but this one was illustrated by someone different.

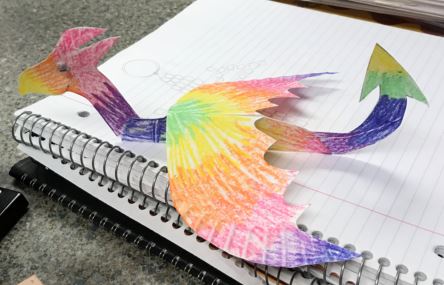
There's A Wocket in my Pocket - some of the kids loved this one, others didn't quite get it. ("There can't be a ZLOCK behind the CLOCK! There's no such thing as a zlock!") Even the resistant ones loved making their own wockets, though. We used clothespins from the dollar store, feathers, foam stickers, and googly eyes. I actually didn't have any pockets, but we decided it could be a zeater for my sweater. (One little one also didn't have pockets, and ended up making a goot for her boot, and a lirt for her skirt.)

 Here's what my wocket ended up looking like. You need:
  • Clothespins
  • Googly eyes
  • Assorted decorating bits, like feathers, foam stickers, or sequins
  • Glue
  • Crayons or markers (optional)  
If you use the springy kind of clothes pins, you can make the face on either end, because it'll clip on either way. If you have peg clothespins, make sure the face is at the closed end, so you can tuck him in your pocket.


I also try to do themed songs and fingerplays with my stories, and this week, I lovingly ripped them off from a couple other librarian blogs.  This song is from Miss Meg's Storytime.
I Don’t Like Green Eggs and Ham
(to the tune of “London Bridge is Falling Down”)
 I don’t like Green Eggs and Ham
Eggs and Ham, Eggs and Ham
I don’t like Green Eggs and Ham
Sam I Am!
Would you like them here or there?
Here or there, here or there?
Would you like them anywhere?
Green eggs and ham?
I don’t want them here or there
Here or there, here or there
I don’t want them anywhere
Sam I am!
You should try green eggs and ham
Eggs and ham, eggs and ham
You should try green eggs and ham
You might like them!
And this fingerplay is from Mel's Desk:

One little cat on a sunny day
Put on his hat and went out to play
Two little cats when the sky turned dark
Put on their hats and went to the park
Three little cats when the sky turned blue
Put on their hats and went to the zoo
Four little cats by the kitchen door
Put on their hats and went to the store
Five little cats on a sunny day
Put on their hats and they all ran away.

Yes, I made my own little hats. Not as easy as it looks, but they worked! I put a hat on each finger as we said each line, and we counted that our little hats had the same one, two, three red stripes; and one, two white stripes, as the Cat in the Hat's hat.

Thoughts:

Overall, it went well. I do three different storytimes - a BabyTime, a StoryTime, and a Pajama Time (at night, for working parents - this one is only once a month). I use the same theme for all three, but usually different books. But, honestly, I have parents bringing older kids to BabyTime, and babies to StoryTime, so they end up being pretty similar. I can't do a "bounce your baby!" rhyme when half the group is 3 years old. But, everyone seems happy with it, so we'll keep going.

Also: this post took me forever to write. Maybe I'll get quicker at it? Hmm...